

Golden Teacher Magic Mushrooms Grow Kit Getmagic

$34.95
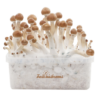
The GetMagic Golden Teacher magic mushroom grow kit includes 1200 cc of mycelium-colonized substrate, which is ready for growing your own Golden Teacher mushrooms.
A grow bag and paperclips are provided. Simple setup, many flushes, and a decent yield! The golden teacher guides you through multiple dimensions and higher atmospheres.
It lifts you to a higher level of intelligence and spirituality. This golden mushroom shows how to trip. It’s been a tough journey. The mushroom can grow rather large, with a golden cap.
Description
Buy Golden Teacher Magic Mushrooms Grow Kit Getmagic Online
Please find out more about storage, directions, dos and don’ts, picking and harvesting, and soaking. This will help you effectively grow Golden Teacher Magic Mushrooms Grow Kit Getmagic and produce an abundance of potent mushrooms.
| What’s in the box? | You need |
| 1x substrate container with 1200 cc/ml mycelium, perlite, and vermiculite1x grow bag with air filterPaperclip(s) | Misting Bottle: Misting is needed for the humidity levelPotable water for misting and soaking; warm water for soakingClean environment: Work clean to give other fungi and bacteria (microorganisms) no chance to contaminate. |
We recommend using
- Surgical gloves
- Facemask
- Disinfectant for hands
- Disinfectant for surfaces
- Soaking Bag
- Thermometer
- Thermo mat (when room temperature drops below 18°C)
How do I store Golden Teacher Magic Mushrooms Grow Kit Getmagic?
Do not store your grow kit longer than 2–3 weeks
We recommend that you begin growing your mushroom kit immediately. If you wish to grow later, do not keep your grow kit for more than 2–3 weeks after it was manufactured.
Store in a cool place
Always keep the mushroom growing kit in the fridge (2°C to 4°C). The manufacture date and the two digits of the week number are printed on the cardboard box.
Avoid contamination
Make sure your fridge is clean and free of bacteria, yeasts, and other sources of contamination. To be safe, pack the culture kit in a clean plastic bag and seal it tightly.
Instructions
- Wash your hands thoroughly, and clean the outside of the grow kit with a dry cloth. Remove the lid and save it for step 2
- Fill the grow kit to the edge with lukewarm water (20°C), put the lid back on the grow kit, and let it soak for 5 minutes.
Important: Never soak the grow kit for more than 1 hour! - Remove the lid from the grow kit and drain the water well. Let the growkit drain for 10 seconds.
- Place the growkit in the grow bag and fill the grow bag with a cup (200–250 ml) of lukewarm water (20°C). Then fold the top of the bag and close it with 2 paperclips.
- Place the growkit in a place with an average room temperature of 20–25 °C. Make sure that the grow kit is not in direct sunlight, not under a lamp, and not near a radiator/heat source.
Important: The bag must remain closed until the first pinheads form. Until then, the CO2 content and humidity inside the bag should be as high as possible. - When the first pinheads* are visible, let some fresh air into the grow bag daily (for a few minutes) and then moisten the grow kit with a misting bottle.
Pinheads are the first visible forms of tiny mushroom caps. It can take 10 to 20 days for the first pinheads to be visible. - The mushrooms can be harvested just before the membranes on the bottom of the cap open up. While harvesting, gently grasps the stem and turn it left/right. When the mushroom becomes loose, pull it out as carefully as possible.
Important: The mushroom must be completely removed so that there is room for a new one. - Congratulations! The harvest is complete. It is now possible to grow a new flush of mushrooms by repeating steps 1 to 7.
Read the following do’s and don’ts for successful growth.
Even though mushroom grow kits are simple to use and reasonably foolproof, we’ve distilled the most important aspects for you. Temperature, light, humidity, the initial mushrooms, and the growth cycle are only a few examples.
Temperature
The ideal temperature for mushroom growth is 24°C. The temperature should not drop below 20°C or increase above 29°C. You can use a thermo-heating mat to keep the temperature from dropping below 20 degrees Celsius. A thermometer is essential in the winter and in colder climates around the world.
Light
The mycelium in the magic mushroom kit simply needs light to ‘understand’ when it reaches the surface. Only then will the mushrooms emerge. A few hours of fluorescent, artificial, or indirect sunlight per day is adequate. Direct sunlight damages mycelium, so keep it away from the grow kit.
Humidity
Misting starts on the day the first pins appear. To open the grow bag, first remove the paperclip. Spray once against each side of the bag rather than directly onto the cake. So, you must do it four times per day. Misting also allows new oxygen to enter the bag. After misting, quickly close the bag with a paperclip.
Frequent air exchange (FAE)
Keep the grow bag tight until the first pins appear; CO2 levels should be as high as possible to stimulate pinning. After the pinning step, you can open the bag 1-2 times per day to allow fresh air to enter. Open and seal the bag, pushing out the air and letting in some fresh air.
The first shrooms!
If the growing conditions are excellent, the first small mushrooms (pins) should appear within 10 to 20 days. The strain also has an impact on this. Some Cubensis strains mature more slowly than others. It may take another week for it to mature. A whole development cycle can take up to 4–5 weeks.
Flushes
The mushrooms form clusters. A flush is a form of growth similar to this. A kit can give multiple flushes. The initial two flushes are the most critical. More flushes will occur, each smaller than the last.
Picking and Harvesting
Pick mushrooms when the veil between the hat and the stem is about to tear or has recently torn. If you wait too long, the mushrooms will release their spores. Pick only the ripe mushrooms and leave the rest to grow. The alternative is to remove all of the mushrooms and start a new flush. How to Select Mushrooms
- Use surgical gloves or disinfect your hands, wrists, and arms.
- Remove the mushrooms from the cake by taking hold of the base of the mushroom between the thumb and index finger.
- Rotating your hand clockwise slowly until the mushroom lets go.
Do not remove the mushrooms. This would endanger the mycelium and possibly kill it. Pick the tiny mushrooms and pins once you’ve picked the majority of the larger mushrooms.
Mushrooms that grow from the sides
Mushrooms thrive where there is enough light and little penetrating resistance. Because the sun shines on the sides of the cake, mushrooms may grow there as well. You have several options:
- Darken the sides of the kit by putting it in the cardboard box.
- Spray the topsoil a bit to stimulate more growth on the top
- Do nothing and let them grow
Soaking
After all the mushrooms are harvested, you prepare the kit for the next flush. Disinfect your hands or use gloves; take the grow box out of the grow bag.
- Fill the container with lukewarm water (20°C)
- Take the lid off and use it to close the container.
- Let it soak for 5–20 minutes.
- Remove the lid and drain the water
- Place the grow kit in the grow bag and fill the grow bag with a cup (200–250 ml) of lukewarm water (20°C)
This is referred to as the soaking process. The cake will now absorb water, making it ready for the next flush. While soaking, hang the grow bag with the micron filter upside down to dry. After each flush, many growers like to use new and unused grow bags.
Next Flush
To proceed, repeat steps 2 through 7 as you did when you originally started the process. A new flush will occur a few days later. A grow kit can provide at least two flushes. The initial flush is frequently the largest.
The End
After the second flush, if no more mushrooms appear in your grow kit for at least 5–6 weeks or if the grow kit turns green, red, grey, or yellow, it can be thrown. The color shift indicates that the grow kit has been infected with a different fungus or bacteria. The mushroom grow kit will no longer produce mushrooms and should be dumped in the garbage or yard.
Spores
When you pick the mushrooms too late, they will release their spores. The spores cause the cake and mushrooms to turn black/purple (other Cubensis strains turn red/brown).
This isn’t a major deal; it just doesn’t look very good. When mushrooms release spores, they begin to decay, and the active compounds degrade. Mushroom potency will be lowered.
Golden Teacher Strain information
Some believe that a specimen of the Golden Teacher mushroom was discovered growing wild in Florida, USA, in the 1980s. The word spread swiftly because of the striking golden hats with yellow speckles. In comparison to other Psilocybe cubensis mushroom species, the Golden Teacher magic mushrooms are quite large and gorgeous.
The Golden Teacher is so named, according to tradition, because “the entire shroom can sometimes have a golden yellowish color that vanishes when maturity starts to set in, right before the veils break when the primordia are at their largest size before becoming mature.” Source: fanaticus.com, which is currently inaccessible.
- Origin: Unknown, possibly USA
- Cap: 20-50 mm, Brow to Golden (yellow) brown when the mushroom matures,
- Stem: 40–125 mm, medium–large in size, bruises green–blue when touched
- Spores: Dark purple brown, 11.5–17 x 8–11 µm, subellipsoid, basidia 4-spored
- Substrate: PF Tek and BRF, Rye grain, Straw and Dung
About GetMagic Grow kits
GetMagic mushroom grow kits contain everything you need for growing magic mushrooms at home.
- a grow bag
- ready to grow mushroom substrate
- and clips to close the bag
The GetMagic grow kits recreate the cool of multilayer magic mushroom grow kits from the past. The mycelium is entirely colonized, with perlite underneath and a layer of vermiculite on top.
These layers keep the equipment wet and make it easy to maintain ideal conditions. The GetMagic grow kit will need your help, love, and positive energies to reach its full potential.
Simply add water, and you will be rewarded with a large amount of mushrooms in 2-4 weeks. This kit is designed only for small-scale home use. For human consumption only. Use it just for spore reproduction and research.
Be sensible
Check out the responsible use page for more information on do’s and don’ts.
| Productcode | MCS.GKMYC.001-GTEA-1200 |
|---|---|
| Weight (KG) | 1.0000 |
| On Sale? | No |
| Alternative product: | No |
| Grow Kit type | No |
| Difficulty | Easy |
| Size | Extra Large |
| Species | Psilocybe cubensis |
| Origin | Netherlands |
| Potency | Average / High |
| Optimum cultivation temperature | 24ºC |
| Yield (from) | 200 grams |
| Yield (to) | 800 gram |
| Water spray is needed. | Yes |
Reviews (0)
Be the first to review “Golden Teacher Magic Mushrooms Grow Kit Getmagic”
Related products

Magic Mushroom Grow Kits Australia

Magic Mushroom Grow Kits Australia

Magic Mushroom Grow Kits Australia

Magic Mushroom Grow Kits Australia

Magic Mushroom Grow Kits Australia
Magic Mushroom Grow Kits Australia

Magic Mushroom Grow Kits Australia

Magic Mushroom Grow Kits Australia

Magic Mushroom Grow Kits Australia

Magic Mushroom Grow Kits Australia

Magic Mushroom Grow Kits Australia

Magic Mushroom Grow Kits Australia

Magic Mushroom Grow Kits Australia

Magic Mushroom Grow Kits Australia

Magic Mushroom Grow Kits Australia

Magic Mushroom Grow Kits Australia

Magic Mushroom Grow Kits Australia

Magic Mushroom Grow Kits Australia

Magic Mushroom Grow Kits Australia

Magic Mushroom Grow Kits Australia
Reviews
There are no reviews yet.